

Teaching children with Down Syndrome to read is not rocket science. You just need patience, consistency, and the right materials. I’ve written many posts on teaching children (with or without Down Syndrome) to read, and I’ve shared many free resources. However, here I want to put everything in one place in a step-by-step guide. I want to make teaching as easy as possible for parents or anyone who wishes to undertake this seemingly daunting task of teaching a child with Down Syndrome to read.
Note: This is a super-extra-long post with lots of videos. For a printer-friendly 100-page E-book (with links to the videos), click below:

Introduction
Before you begin, set your expectations.
To teach a child with Down Syndrome to read, you need patience. Don’t expect rapid progress, although some children with DS do learn to read quickly and easily. But do begin early, as early as three years old. This is because children with DS tend to be strong visual learners, and learning to read sight words in the preschool years will greatly facilitate the development of speech and language skills.
Part of being patient is having realistic expectations. Most children with Down Syndrome can learn to read and write, but without the right materials, preparation, and accommodations, phonics can be very challenging. Even then, expect to spend a considerable amount of time demonstrating how to blend sounds in new words before expecting your student to decode.
While I was teaching my son to read sight words, I spent 6-9 months demonstrating how to sound out those words before ever asking him to sound out words himself. But when we finally did start phonics, he easily learned to decode.
While I was teaching him phonics, I spent another academic year demonstrating how to segment words (break a word into its sounds in order to spell) before asking him to segment words himself. Children with DS are often very hesitant to try new things. Expect to keep demonstrating until they feel they are ready to try.
What type of progress can you expect? Sue Buckley writes:
We know from many published studies and our own teaching that children with Down syndrome vary widely in their progress with phonics – some children master phonics as easily as same age peers at 6-7 years but they are a small minority. Most child will progress slowly at their own pace. They do learn the letter-sound correspondences, can sound out the letters they see in a word but find it difficult to blend to identify the word. Individual rates of progress vary widely.
* Buckley S (2023) Teaching children with Down syndrome to read: phonics or sight words? (Available from the author – a more detailed version will be available on the DSEI website shortly)
To teach a child with Down Syndrome to read, you need consistency. Plan on 10-15 minutes a day, five days a week. Little by little build that up to 30 then 45 minutes of reading instruction per day. You can break this into two smaller chunks per day if your child has a short attention span. But what’s absolutely necessary is the consistent, daily practice. Fifteen minutes each day is far more effective than an hour a week. In addition, because of short term memory issues, your child may need many little opportunities throughout the day to review/practice what he/she has learned.
Being consistent is a matter of prioritizing and being convicted of the importance of teaching your child to read. Being able to read will improve your child’s cognitive and speech abilities, and vastly improve his/her overall quality of life.
Finally, to teach a child with Down Syndrome to read, you need the right method and materials. This is the reason for this long post. I want to share with you the Down Syndrome friendly materials have used and created for my son and his friends with Down Syndrome. This post contains videos, methods, and materials for teaching children with T21 how to read by sight and how to read phonetically. My hope is to help you choose motivating and affordable materials to help your child learn to read.
Phonics or Sight Words?
Parents of children with Down Syndrome may wonder how to start teaching their child with Down Syndrome. Should they start with sight words or phonics?
Many experts, such as Sue Buckley, Natalie Hale, and Mrs. Brown, and many reading experts in Europe who have extensive experience teaching children with T21 to read recommend starting with sight words first. This is true even in countries such as Spain, where the rules of phonics and pronunciation of Spanish are much more straight forward than English.
Here are five reasons why I recommend starting with sight words, especially if your child is just starting kindergarten:
- Many children with T21 are able to start learning sight words as early as three years old. This can support speech production, visual discrimination, and vocabulary development.
- Most children with T21 have speech delays and short-term and verbal memory delays. Thus, most children with Down Syndrome are not developmentally ready to learn phonics when they enter kindergarten at 5-6 years of age.*
- Children with T21 are at high risk for developing task-avoidance behaviors if they are not developmentally ready for the work required of them. Thus motivation and early success are key to reading progress. Starting with sight words first makes it easier for children to get “hooked” on reading, as they can go straight from text to meaning without having go the laborious route of sounding out and blending. It sets them on a path of confidence and success in reading.
- Once children with T21 are reading confidently with a large bank of memorized sight words (50-100 words), they will more easily understand how phonics can help them figure out new words by themselves.
- Research has shown that children with T21 who memorize a large bank of sight words before starting phonics progress faster in phonics compared to those who don’t.*
* Buckley S (2023) Teaching children with Down syndrome to read: phonics or sight words? (Available from the author – a more detailed version will be available on the DSEI website shortly)
It’s helpful to remember that the phonics vs whole word debate dates back to the 16th century with the pendulum swinging back and forth. Currently, in the United States, Science of Reading-based phonics is considered the most effective way to teach reading to all learners, including struggling readers and those with dyslexia. However, to date there is no large-scale, long term research on children with Down Syndrome to indicate this is the best method for children with Down Syndrome in English speaking countries. What we do have are recommendations of highly experienced SLPs and teachers who have taught hundreds of children with Down Syndrome to read. These practitioners are not stuck in the “antiquated” educational philosophies of the 50s, when whole word reading was widely popular in schools. Rather, their experience has shown that when children with Down Syndrome start with sight words first, they learn to read for meaning and are better prepared for phonics. We know children with Down Syndrome have a specific learning profile. Thus, it is necessary for us to teach the way they learn, regardless of the latest educational trends. As the saying goes: If they don’t learn the way we teach, we must teach the way they learn.”
Within Down Syndrome, there is a wide spectrum of abilities as well as many mixed diagnoses. Thus, while most children with Down Syndrome can learn to read by sight, not all will be able to understand or use phonics for reading. Some children with dual diagnosis of Down Syndrome and autism have brilliant memories for sight word reading, but cannot make sense of English phonics. Recognizing that children with Down Syndrome are neurodiverse, it is more helpful and compassionate to support them in the way they learn instead of belittling whole-word reading and insisting on the latest educational trend.
At the same time, we shouldn’t stop at sight words. Phonics is important. Learning to decode using phonics is necessary for independent reading. It opens up the door to even more vocabulary. It is also an important tool for working on articulation and increasing the intelligibility of our children’s speech. For individuals with DS who really struggle with intelligibility, that is, the ability enunciate each word clearly, spelling and being able to write out what it is they want to say becomes an important alternative form of communication. Thus, I recommend teaching phonics to children with Down Syndrome after they have learned to read by sight, with the understanding that some children will master phonics while others will strongly prefer sight words.
Forty years ago, it was widely assumed that children with Down Syndrome could not learn how to read. Now, with the right methods and materials, we know they can learn to read using the whole-word method. Perhaps, with a variety of Down Syndrome-friendly materials and methods, phonics will be more accessible to children with Down Syndrome. Perhaps with the discovery and development of appropriate materials, more and more children with Down Syndrome will become fluent independent readers and writers. In the realm of phonics, the work of Judy O’Halloran and Marilee Senior is a great start. But teachers and parents need more options, and they need affordable options in order to find what really works for them and their students. This is why I’m spending so much time documenting how I taught my son to read with both the whole word approach and using phonics
Finally, children with Down Syndrome do best with highly individualized and personalized teaching, especially when it comes to learning to read. This is why I think many parents are in such a strong position to teach their own children to read and/or support their child’s learning at home. Most schools need experts to advise teachers how to teach because in most schools, teachers must teach the class, not the individual. Hence they rely on experts to report what they think works for most children.
As a parent, you know (or can quickly discover) what works best for your child. Of course, consider the recommendations of experts, but feel free to tweak those recommendations based on the individual needs and interests of your child. If your child just isn’t getting sight words, try phonics. If phonics is frustrating, try sight words and return to phonics later. Be flexible and willing to try different approaches. Observe your child carefully and seek to understand the way he/she learns best; trust your intuition. For your child with Down Syndrome, whichever way your child enjoys most and feels successful at, that is the way to start.
The Three Stages of Reading
Teaching children with (or without DS) can be broken down into three basic stages:
- Stage 1 – The Logographic Stage: Learning to read sight words and learning letter names and sounds
- Stage 2 – The Alphabetic Stage: Learning how to blend letter sounds and learning to decode all the phonograms in one-and-two syllable words
- Stage 3 – The Orthographic Stage: Learning to decode multi-syllabic words and the study of morphemes
Learning to read is a very fluid process. One stage does not end with the beginning of another; rather, as you will see, the stages often overlap.

The three stages of reading correlate to three routes to reading. I will briefly describe each stage/route and what we can expect for our students with Down Syndrome.
Stage 1 – The Logographic Stage: The Visual Route to Reading
The logographic stage of reading is the earliest stage, particularly relevant for young children just beginning to interact with written language. During this stage, children use the visual route to reading; they memorize words based on visual features or context.
This route requires the skill of visual discrimination, but it also strengthens that skill. As students memorize more and more words, they learn to pay more attention to detail so as to discriminate, for example, doll from dog. Most children with Down Syndrome do well at this stage, and many are able to learn sight words as easily as their typically developing peers.
The main advantages of this route are:
- Students can go straight from text to meaning.
- Teachers are free to choose words that are most meaningful and motivating for their student. For example, a child who was highly interested in dinosaurs could be taught to read the word “dinosaur” or even “Tyrannosaurus Rex” much sooner than if he started to read using only phonics.
- Thus, early on, children can read texts that are much more interesting than “The cat sat” and “The fox is in the box.”
- Many children with Down Syndrome are able to start memorizing sight words as early as three years old, and this supports the acquisition of speech and language skills
However, this route does not promote independence in learning to read new and unfamiliar words. Thus the need for moving on to the alphabetic and orthographic stages of reading.
For children with Down Syndrome, the logographic stage should not end when the alphabetic stage begins. Children with Down Syndrome benefit from continued memorizing of sight words, even while they are learning to decode, because the more sight words they know the more they are able to intuit and internalize phonetic rules and spelling patterns.
Stage 2 – The Alphabetic Stage: The Phonological Route to Reading
The second stage of reading is the alphabetic stage. In this stage, children begin to understand the relationship between letters (graphemes) and sounds (phonemes). They use this knowledge to sound out and decode unfamiliar words for reading and to encode words for spelling. It correlates to the phonological route to reading, which relies heavily on auditory discrimination and phonological memory.
This route requires phonemic awareness skills, such as the ability to hear and manipulate individual sounds in words. The most important PA skills are:
- blending – combining sounds to make a word
- segmenting – breaking a word into individual sounds
- manipulating – adding/deleting/substituting sounds
In order to practice these skills, children need a strong phonological memory. Phonological memory is a specific part of working memory that helps a person remember spoken information for a short time—especially sounds and words. It’s essential in early reading, particularly when learning phonics, because it allows children to temporarily store the sound structure of words while manipulating or analyzing them.
Here are two examples:
- When decoding a new word like frog, a child must hold the sound sequence /f/ /r/ /o/ /g/ in his/her memory long enough to blend it and say the full word. If the memory span is too short, the child may forget the first sound before reaching the last.
- When a teacher says, “Spell ship,” the child has to hold onto /sh/ /i/ /p/ while writing or selecting the letters. The child relies on phonological memory to store the sounds and recall which letters go with them while keeping in mind the correct sequence of the sounds.
Children also need good auditory discrimination skills. For example, they need to be able to clearly hear the difference between /f/ and /v/ or /t/ and /d/. For children with hearing loss or hearing impairments, this can be very challenging.
The main advantages of the phonological route are:
- it promotes students’ ability to decode unfamiliar words independently
- it enables students to spell phonetically
- with enough repetitions of decoding/encoding each word, students begin to orthographically map them (memorize words based on sound and spelling) for instant recognition
The main disadvantages are:
- it is a slow, sequential, and laborious route, especially when students are first learning to blend
- phonetically controlled texts that the students read are often pedantic and impersonal
- the focus is on “What does this word say?” as opposed to “What does this word mean?”
- The phonemic awareness skills needed for the phonological route are usually very challenging for children with Down Syndrome.
Stage 3 – The Orthographic Stage: The Visual-Analytic Route to Reading
In the orthographic stage of reading, efficient pattern recognition replaces the slow letter-by-letter decoding of the alphabetic route. Children move beyond decoding words letter by letter (or phonogram by phonogram) to instantly recognizing whole words and word chunks. In this stage, the reader’s cognitive energy shifts from “What does this word say?” to “What does this text mean?”—opening the door to fluent, engaged reading and richer comprehension.
The orthographic stage correlates to the visual-analytic route because students use recognized word chunks, such as spelling patterns, syllables, and morphemes to quickly decode new words.
Here are the skills children develop and use during the orthographic stage:
| Skills | Examples |
| Automatic word recognition | Students read words like *interesting* or *beautiful* instantly without conscious analysis |
| Chunking by patterns | Students spot familiar chunks to decode new words quickly. For example *tion* in “action” or *ence* in “consequence”. |
| Rapid decoding of multisyllabic words | Students sound out unfamiliar words syllable-by-syllable instead of letter-by-letter. |
| Morphological awareness | Students recognize roots and affixes (e.g., *play + ed*, *un + helpful*) and use them for meaning and spelling. |
| Fluent, expressive oral reading | Students read with smooth phrasing, correct intonation, appropriate expression, and minimal hesitations. |
| Use of pattern-based spelling, not just sound-based spelling | Students choose *-ck* at the end of a short vowel word (as in truck), or *-dge* to spell the sound of /j/ at the end of a word (as in bridge) |
During this stage, students receive explicit instruction in spelling patterns & morphology
- They learn common spelling patterns such as -ould, -tion, and -ence.
- They learn the syllable types (for example: closed, open, r-controlled, etc.)
- They also learn morphology, which is the study of prefixes, suffixes, and Latin/Greek roots
This stage usually begins around the third grade, although syllable patterns are often introduced in second grade. Once students have mastered most of the skills involved with orthographic reading, they should be reading at a late fourth, early fifth grade level. Students will continue to develop their reading vocabulary and comprehension skills, but the emphasis will move away from learning to read towards reading to learn.
Children with Down Syndrome need a Special Approach
One might think that the orthographic stage is the most challenging of all three. But here’s a surprising fact: Because the phonological route is so difficult for many children with Down Syndrome, some European teachers who specialize in teaching reading to children with Down Syndrome teach letter-sound correspondences, but skip the rest of the alphabetic stage. They go straight to the orthographic stage. They don’t teach blending.
For example, Victoria Maria Victoria Troncoso and Mercedes del Cerro, in Spain, have written extensively on a teaching method that goes straight from reading via the whole-word method to syllabic decoding.
Hedianne Bosch, from the Netherlands, author of Read ’n Talk, (Leespraat in Dutch) has written that for children with Down Syndrome, phonics is often a trap, rather than a door to reading. She also uses a method that bypasses the phonological route and goes straight from the visual route to the visual-analytic route. Her book Read ’n Talk is only available in Dutch, however, she has written a fascinating paper in English: The visual-analytical approach to reading in Read ’n Talk: The theory behind the practice (not yet available online).
Now, the Spanish language has transparent orthography, meaning the rules of spelling and pronunciation are regular and predictable. Dutch has semi-transparent orthography, meaning the rules of spelling and pronunciation are mostly predictable with some aberrations. The English language, however, has opaque orthography; there are exceptions to every rule, and spelling and pronunciation can be unpredictable. Think, for example, how to explain the rules for the different sounds of the letter O in the words bomb, tomb, and comb.
All this makes me wonder if bypassing the phonological route and going from memorizing a large bank of sight words (including multi-syllabic sight words) to the visual-analytic route is possible in English. I’ve never heard of such an option before. But, as Bosch points out, some profoundly deaf children do!
However, that is not what I am proposing in this guide. My point in sharing this fact is that sometimes we need to take surprising and unusual paths and not insist on one way only. What I am proposing is that we be very open-minded and flexible. If we can’t bypass the phonological route because the opaque orthography of our language does not permit it, we must try to find ways to make the phonological route more accessible for our extra-special students. We must find a way that capitalizes on our students’ visual strengths and compensates for their weak phonological memory.
I think I have found one such way – a way paved by research, practice-based evidence, and years of teaching, but most of all by love for my son and the undying desire to help him and his friends with Down Syndrome reach their full potential. This is the path I wish to share with you, with the hopes that it will give you ideas for finding a path forward for your student.

Setting the Stage
Preparing Your Child for Learning to Read
Learning to read via the whole-word approach will be easier for your child if you have prepared him/her for the process. Here are three ways to set the stage:
- Set a routine. Choose the best time of the day for working with your child, and begin doing fun activities and educational games at that time every day. Let your child come to expect this is fun, quality time with you and your undivided attention.
- Teach your child that words have meaning. Instead of assuming that your child intuitively knows each word has a unique meaning, it is better to explicitly teach that concept.
- You can begin by casually pointing out words in their environment, such as words on t-shirts, book covers, street signs, and cereal boxes. For example, you could pull out one of your child’s t-shirts, point to the words on it and say, “Oh look! These words say _______”. Or pull out a jug of milk, point to the word and say, “This says milk.”
- You can put signs on doors, such as “Michael’s room” and “bathroom”. Every time you go to the room with your child, you can point to the sign and ask, “Whose room is this? Or, what room is this?”
- You can play a word hunt game where you and your child go around the house finding items with words on them. For every word, you point to it and say “This word says ______”. Then encourage your child to repeat.
- You can ask your child to bring you his/her favorite toy characters. On index cards, write the name for each (in very big, bold letters). Then read each card and have your child put it next to the character. For example, if your child likes Thomas the Tank Engine trains, you might write, “Thomas” on one card, “Percy” on another, and “James” on a third. Then, you would point to the name on each card and read it, saying,” Look! This says Thomas. Can you put this card next to Thomas?” At this point, you are not teaching your child to read the word. You are simply introducing the concept that each written word has a unique meaning.
3. Play lots of matching and sorting games to build visual discrimination. Encourage your child to match shoes, socks, and anything around the house that can be matched. Eventually move to matching pictures. You can start with photos of family members, and then move to high interest pictures. Finally move on to matching identical letters of the alphabet. In addition, help your child to sort Duplo blocks by shape and color, to sort cutlery as your pull them out of the dishwasher, and to sort shapes on wooden shape sorters.
These simple activities will help prepare your child for Stage 1 of Learning to Read.
Stage 1 – The Logographic Stage
Teaching Sight Words and Letter Sounds
Step 1: Teaching Sight Words
Long before children with DS are ready to begin phonics, they can learn to read words by sight, and doing so is a valuable tool not just for reading but also for developing speech. When a child learns to read by sight, the written word becomes a powerful visual prompt for naming things. With the help of sight words, my son was able to practice naming things and saying complete sentences that he otherwise would not have said on his own. And eventually, he was saying many of those sight words spontaneously.
Apraxia of speech is a motor planning disorder that is widely under diagnosed in the DS population. These children in particular need to be explicitly taught to say many words. Libby Kumin writes: Most children learn the sounds for speech by listening to and watching adults and other children around them. In children with childhood verbal apraxia, however, the skills needed to program and sequence the movements for speech must be taught and practiced deliberately and often.
I have found that learning to read words by sight is an excellent way to help children practice new words. The amount of practice and repetition involved with learning words by sight helps children learn the the sequence of movements for new words.
In her manual for parents and teachers entitled Reading and Writing for Infants with DS (0-5 Years), educator and researcher Sue Buckley writes:
Reading activities may be the most important intervention for promoting the speech, language, and cognitive development of preschool children with DS…. we are quite convinced that reading is the single most effective way to help children overcome the learning difficulties associated with DS.
Here are my favorite materials for teaching sight words:
DSE’s See and Learn Phrases kits

This is the kit that launched my son with DS into reading, and it was both amazing and exciting to see him learn to read at the age of 3 1/2. The teaching method in this set capitalizes on our children’s visual learning strengths and uses an errorless teaching technique that is very effective. The instructions are very easy to follow. To learn why and how to use them and for videos of my son learning to read with them, click here. These materials are expensive (although worth the price). I always prefer printed curricula over digital, but if the price is prohibitive, an app version is also available.
CASE STUDY NO. 1 – CHRISTOPHER’S PROGRESS WITH SEE AND LEARN PHRASES
Christopher started learning to read with the See and Learn Phrases Kit 1 when he was three and a half years old. Every morning after his breakfast, we would work on See and Learn. Our first lesson was about ten minutes long. With consistent, daily practice, he learned to read all the words in the See and Learn Phrases Kit 1 in about 4 months (about 1 new sight word per week.) Little by little I began to stretch our reading lesson time, as we added in personalized books I made for him.
At some point during our work with the See and Learn Phrases Kit 2, something clicked, and he started learning new words at a faster pace. It took him two months to master all the words in Kit 2, and only one month to complete Kit 3. After that, his progress took off exponentially, and he practically devoured the expansive See and Learn Sentences Kit, learning to read 7-8 new words a day.
Free Resources to Supplement See and Learn Phrases
I also created these materials to supplement the See and Learn Phrases Kits for my son. They are all available on the blog for FREE:
- See and Learn Phrases 1 Practice Workbook: If you want to test your child’s readiness for See and Learn without purchasing it first, try this FREE workbook. I will say that what got my son hooked on See and Learn Phrases was reading the books that came with it. This does not come with books, but it may give you a sense of whether or not your child is able to match pictures and words.

- I did make books to accompany the See and Learn Phrases Kits: Set 1, Set 2, and Set 3, which you can download for free.

The Faith and Freedom Primers
In these Catholic primers, words are introduced incrementally and then used repeatedly for the rest of each book. In this way, children really remember each sight word. I used this series with all my typically developing children at the same time they were learning phonics. For my son with DS, I adapted the primers and created word and picture cards. He learned to read these before learning phonics. My son and the boys in our Down Syndrome co-op really enjoyed these books and the picture/word cards.

These books, along with instructions on how to use them, are available for FREE on the blog:
These primers are very similar to the Dick and Jane series, however the Faith and Freedom Primers present new words in a much more incremental, systematic manner.
Montessori Three-part Cards
Maria Montessori was an absolutely brilliant educator. She astutely observed that children could learn to read sight words using three-part cards. With these cards we used the exact same three-step method as we used for the See and Learn Phrases Kits: match, select, and name/read.

Here are links to FREE Montessori-inspired three part cards or See and Learn-inspired cards you can use for teaching sight words:
- Autumn-Themed Sight Words
- School Time Sight Words
- Winter Themed Picture and Word Cards
- Nativity and Christmas Cards
- Around the House and Food Themed
- Bear Wants More
- Construction Vehicles
I made these high-interest cards for my son. Even as we began phonics, we continued to learn these new words by sight because he really enjoyed the process.
Here’s how to use Montessori Three-Part Cards to teach sight words:


If your child enjoys three-part cards, you can find more Montessori three-part cards online. Etsy has many sets you can download and print. Make sure you choose sets that have letters with large fonts in lowercase.
What if this Match – Select – Read method is just not working with my child?
If your student has trouble matching words:
- Play lots of matching games such as Seek a Boo to build your student’s visual discrimination.
- Make a treasure hunt where your child has to find matching spoons, socks, blocks, etc.
- down21.org has many matching worksheets you can print out and use to help your child practice matching and build visual discrimination. Make sure you set the Google translate to English, as this is a Spanish website.
- Make two sets of alphabet cards and help your child practice matching letters of the alphabet (only in sets of 2-4 letters.) This will also build visual discrimination.
- Reduce the amount of picture and word cards to two sets for matching (instead of three), and make sure the words are visually very different. For example, “dog” and “elephant” look very different. However, “Dog” and “doll” are easily confused when students are just starting to match words.
- Keep on demonstrating until your child begins matching word to word.
If your child has difficulty selecting words:
- If your child knows the letter sounds, emphasize the first letter of the word you are asking your student to select. For example, if you want your child to select “cat”, you say, “ Which word says cat? /k/ /k/ /k/ … which word begins with /k/ ?”
- If your student gives you the wrong word, simply say, “This word says ______.” Then, put it back on the table and ask again, “Which word say cat?” Offer lots of praise when your student selects the card you asked for.
- Reduce the amount of picture and word cards to two sets for selecting (instead of three), and make sure the words are visually very different.
If your child has difficulty reading (remembering) a word after matching and selecting:
- Your student will likely need many more repetitions before it is stored in his long term memory. Write the word on several flash cards and place one in the car, in the bathroom, on his/her pillow, on the stairs, etc. Keep reviewing that word throughout the day, every day until it is firmly memorized.
- Continue matching and selecting activities with that word.
CASE STUDY NO.2 – GABE AND THE POWER OF HIGH INTEREST WORDS
One of the students in our co-op was making steady progress with See and Learn and the Faith and Freedom readers. However, when he began kindergarten, he began making it clear by his behavior that something at school was making him very unhappy. This began to affect his behavior at home and at co-op, where he was becoming increasingly uncooperative.
Gabe loved animals. So to keep him motivated, we centered our reading lessons around learning to read the names of various animals. He learned to read words like elephant, hippo, rhino, and lion. I wrote sentences for him such as “The monkey is eating” and “The rhino is in the mud.” By focusing on a topic that was fascinating to him, we were able to keep him learning through a difficult time in his life. Gabe eventually left the school, and the following year started at a new school where he is thriving.
One important tip:
When teaching sight words, I recommend demonstrating how to sound out each new word as you teach it. For example, if you teach the word “tiger”, you show a picture of a tiger and say, “This is a tiger.” You show the word card and point to the letters, slowly saying, “tiiiiiiiiger”. Then you invite your child to repeat the word and place the word card under the picture. However, you don’t require your child to sound out the word. You simply demonstrate. Over the course of demonstrating a hundred words or more, your child will begin to understand how to blend phonograms. When you do begin phonics, blending should come more easily.
Personal Books
One of the most effective, motivating ways of teaching your child to read is to make personal books that use mainly words your child knows how to read. These books contain pictures and stories about your child and/or the topics that highly interest them. I started making personal books for my son after reading Natalie Hale’s book, Whole Child Reading. He absolutely loved and devoured those books. You can hand write them and draw pictures, or you can make them on the computer. The stories can be fanciful or they can be more of a journal. It doesn’t really matter, as long as the font is super large and the books are of great interest to your child. Granted, making these books can be time-consuming, but once you see how much your child enjoys them, you may find it well worth your time to make them.
Emergent Readers
As your child begins to grow a sight word vocabulary, introduce sight-word based books.

Our Favorite Books for Emergent Readers is a post that lists several sight word-based books phonetic readers. Many of these are available at the public libraries. Being able to read “real” books is very motivating.
Adapted Books for Children with Down Syndrome is a collection of eight emergent readers that you can adapt yourself by printing out the enlarged font and gluing/sticking it into books.
Two More Programs that Teach Sight Words to Children with Down Syndrome:
Here are two more programs that many families have used successfully to teach their children with Down Syndrome to read sight words:
So Happy to Learn at Home – This is a wonderful homeschool program for children with Down Syndrome. Mrs. Brown’s teaching philosophies are just as important as her curriculum.
Special Reads – I adopted many of Natalie Hale’s teaching methods when my son was learning to read. Many of the materials on my blog follow her suggestions. Special Reads is her reading program; it’s a great option for parents/teachers who are looking for a program that is low prep and full of colorful, high-interest materials.
For more information on teaching sight words see:
- Reading and Writing for Infants with DS (0-5 Years) by Sue Buckley
- Whole Child Reading: a Quick Start to Guide to Teaching Learners with Down Syndrome, Autism, and other Developmental Delays by Natalie Hale
- Teaching Reading to Children with Down Syndrome by Patricia Oelwein
Step 2 – Teaching Letter Sounds
While you are teaching your child to read words by sight, teach the letter names and sounds.
My favorite methods for teaching letters sounds are:
Playing with crepe alphabet puzzles. Work one row at a time. Tell you child the name of the letter and its sound and then let him/her push it into the puzzle board. Eventually ask your child to tell you the name and sound of a letter before he/she puts it in the puzzle board.


Play Feed the Monster. Get two canisters with plastic lids. Glue a picture of a monster on each canister and cut slits for their mouths. Make “cookies” out of wooden chips or pieces of card stock. On each cookie, write a letter of the alphabet (as large as possible). You’ll need at least 4 cookies per letter. Choose two letters you want to work on and put all the cookies with those letters in random order. Then help your student sort the letters by feeding each monster the type of letter it likes. (For example, one monster will only eat the letter E cookies, one will only eat the letter B cookies.) Before your student can feed the monster, he/she needs to say its name and sound.

For more ideas on teaching letter names and sounds, see: More Homeschool Activities for Preschoolers with Down Syndrome
Does your child need to know every sound that every letter makes before starting to decode? For example, does your child need to know the three sounds of A, or that C says /k/ and /s/? There are mixed opinions on that. I think it’s reasonable to tell children that A makes three sounds: as in Ann, ate, and almonds. But they only need to memorize the sounds they need for the words they are currently learning to decode.
One tip: when teaching the letter sounds, avoid adding “uh” to the end of consonants. For example, for B, don’t say “buh” but “b”. You can draw out sustained consonants such as M, S, F, V, and Z. But for consonants such as T, D, B, C, and G, keep the sounds as short and clipped as possible.
CASE STUDY NO. 3 – LUKE AND HIS LETTER SOUNDS
After a year and a half of learning to read words by sight, I thought that Luke was ready to begin phonics. However, when it came to naming the letters of the alphabet and their sounds, Luke was often correct but still inconsistent. I wondered if, after working on letter names and sounds for years, Luke was simply bored with the alphabet. I decided that we would move onto phonics, and if he didn’t know a letter sound while trying to decode a word, I would simply tell him that sound. So that’s what we did. As he began to decode and build words, his knowledge of letter sounds solidified. For Luke, it was a case of use it or lose it.
A Bridge to Phonics
Once your child has memorized a large bank of sight words, you can use some of them prepare your child for phonics. The following method teaches children that by changing just one letter in a word, you change the meaning of that word. It also prepares them for blending sounds.


The PDF version of this post includes picture and words cards for bridging to phonics.
Stage 2 – The Alphabetic Stage
As I wrote earlier, the phonological route to reading is challenging for many children with Down Syndrome. Many children with T21 have an impaired or underdeveloped phonological memory, which makes the phonemic awareness skills needed for using phonics very difficult.
Here are some pitfalls children and teachers may fall into when learning phonics:
- children begin to think that blending is reading, consequently “reading” becomes a technical activity rather than a meaningful one
- children are asked decode long word lists without thinking of the meaning of each word
- teachers move on to new phonograms and words before children have memorized newly decoded words for instant recognition
- as frustration or discouragement sets in, children begin to exhibit task-avoidance behaviors, and over time, these behaviors become habitual
The result is that many children with Down Syndrome get stuck in the alphabetic stage for way too many years. I know one young teenager with Down Syndrome who was taught explicit phonics by an Orton Gillingham-trained reading specialist at a school for children with special needs. After five years of phonics, she could still barely read. Unfortunately, her situation is not unique. Hedianne Bosch writes:
Ratz assessed achieved reading stages of 190 school-aged children with Down syndrome in Bavaria, Germany, as compared with over 1400 students with intellectual disability (ID), all attending special schools. Looking at the children with mild ID, he finds that approximately 62% of the children with Down syndrome (DS) remain at the alphabetic stage, compared to around 34% of non-Down syndrome children with mild ID. At an orthographic level of reading the quota is nearly opposite: only 32 % of students with DS reach this level compared to 61% of non-DS students. His findings match my experience that many children with Down syndrome get stuck somewhere in the alphabetical stage and are not able to move on to orthographic reading on their own.
– Bosch, Hedianne, The Visual-analytic approach to reading in Read ’n Talk, 2025

Let’s look on the bright side. Although Ratz’s study is concerning, it shows that some children with DS (32%) have been able to progress through the alphabetic stage to the orthographic stage.
My son did. He progressed through phonics at a similar rate as his typical developing siblings did, and with much more enjoyment. But I had to carefully craft a curriculum especially for him. Having taught his five older siblings to read, I knew Christopher would require a novel approach: one that would take into account his challenges with fine motor skills, word retrieval, and phonological memory. Furthermore, since he had had so much success and enjoyment with See and Learn, I wanted a curriculum that would resemble or “feel like” that method. I was able to piece together a curriculum, and his progress surprised and delighted us.
Avoiding the Pitfalls of Phonics
Taking into consideration challenges with phonological memory, here are ways to avoid some of the pitfalls that leave children stuck in the alphabetic stage:
- Several months before you plan on starting phonics, begin demonstrating how to sound out each sight word you teach. Simply point to each letter/phonogram and slowly say the sounds as you point to them. Do this twice. Then at normal speed, say, “This word says ______________” Don’t ask them to sound out anything. Just demonstrate.
- Use picture-pairing as much as possible so the written word is quickly linked to the meaning of the word.
- Make sure students practice reading and building each new word until it is stored in their long term memory for instant recognition before moving on to new phonograms and words
- In lieu of handwriting, let your student use wooden letters or phonogram tiles
- Use frequent and spaced practice to help your child review newly learned words
- Make sure you balance each lesson so that your student is spending less than 40% of the time blending sounds and decoding new words.
- Make sure each lesson includes practicing instant recall of memorized words on flash cards and in the context of simple sentences, with an emphasis on reading for meaning
- Always use visual supports. Avoid phonemic exercises that are not visually supported (that rely on hearing alone) For example, avoid asking your student to do the following:
- identify the first or last phoneme in a spoken word
- listen to a list of words and pick out that one that does not rhyme with the others
- identify and say a word after a teacher has sounded it out
- Avoid phonemic exercises that do not link to meaning, such as sounding out nonsense words
- Continue to teach meaningful and motivating sight words so your student is reading material that is motivating and relevant to him/her, and not just decodable readers.

Stage 2A – Learning to Blend Letter Sounds
Step 1 – Introduce Phonics with First Steps with Phonics
Once your child is reading sight-word based books like Dick and Jane or the Faith and Freedom primers with ease and is demonstrating good comprehension, and once your child has learned to read 50 – 100 or so words by sight, it is time to begin phonics.
First Steps with Phonics is a series of four workbooks I made for the boys in our Down Syndrome co-op and their moms. And it’s here on this blog for FREE.

It’s called First Steps with Phonics, because it’s not a complete phonics program, but it does walk you through all the incremental first steps needed to help a child with Down Syndrome learn to blend sounds. I designed it to be very easy for both parent and child, with instructions on each page.
For video demos on how to teach blending, see this post: How to Teach a Child with Down Syndrome to Sound Out Words.
If you have a student with poor vision, I recommend these blending cards in extra-large font which I made for one of my students. These supplement the First Steps in Phonics workbooks.


The First Steps with Phonics decodable readers are also in extra-large font. In these readers, first students read the next without a picture (so no guessing!). Then they read the text with a picture.


The easiest readers focus on only one vowel team at a time. The more advanced readers offer practice with mixed vowel teams:


Step 2 – Teaching your child to sound out CVC words
Once your child has completed all four books of First Steps with Phonics, he/she should be well prepared to start learning to decode CVC words (consonant-vowel-consonant words), such as cat, dog, and hen. You could forego First Steps and go straight to the CVC words, especially if that’s what your child is learning at school. I wrote First Steps with Phonics after my son learned to read; he began phonics using the traditional method of starting with CVC words. But I do think First Steps will help you, the parent, learn how to teach your child to decode and spell.
The power tools for teaching children with DS to read phonetically are:
- Montessori language series cards
- phonogram tiles
- decodable readers (readers with phonetically controlled vocabulary)
- pacing board (for spelling)
- worksheets for tracing/writing words
Montessori Language Reading Cards
Montessori Language Reading Cards are an invaluable tool for teaching children with DS to read because they build vocabulary, increase comprehension, and make decoding meaningful and motivating.

Too many phonics programs require children to decode long lists of words. For children with DS, the problems with decoding long lists of words are 1) it is mentally taxing and boring, and 2) decoding long lists can become a phonetic exercise void of comprehension. We know that for many children with DS, comprehension lags behind their ability to decode. They may put so much effort into decoding that they don’t think about the meaning.
Picture pairing is so much more enjoyable and meaningful. Children literally see that each word they decode has meaning, and the pictures help them comprehend the meaning.
Another important aspect to consider is that with picture pairing, you can reduce the possibility of error. This is so important for keeping children with DS engaged, as many children with DS easily become discouraged when they make mistakes. By laying out only a few cards at a time to work with, students know that whatever word they sound out should match one of those few pictures on the table.
Use this sequence to set children up for success:

As your child grows in proficiency, you can increase the matrix of pictures. Make sure you only work on one vowel at a time (ie. all the short A words, then all the short E words, etc). Keep reviewing until your child can name each picture, decode each word, and match each word to each picture independently.
The Montessori Language Series Cards I recommend are from The Little Spark Company. For CVC words, use the Pink Language Series. At a minimum, get the Pink Series Reading Set:

The CVC reading bundle is a wonderful resource, too. It includes the reading set and materials for spelling, bingo, and decodable readers with classic art. These materials take a considerable amount of time to print and prepare, but they are well worth the effort.

DECODABLE READERS
Decodable readers should be the heart of any phonics program. Phonetic exercises and games have their place, but the only way to gain real fluency in reading is by reading. Effective decodable readers build on previously learned material and offer lots of review while focusing on the new phonograms.
Many children with Down Syndrome have poor visual acuity, meaning their vision is not sharp.
Many children with Down’s syndrome will need to wear glasses, but even
when correctly fitted glasses are worn, 100 per cent of children with Down’s
syndrome have poorer visual acuity than other people. These children
see the world differently; their world lacks fine details and sharp contrasts.
Thus reading materials, for example, do not look the same to a child with
Down’s syndrome as they do to his/her classmates. To take advantage of their
strength as visual learners and to help them succeed, we need to make sure
they can see things. Providing them with big and bold printed materials will
help to compensate for their poorer visual acuity. It is very important to take
their poorer visual acuity into account in all settings where children are learning.— Stuart Mills, Special Educational Needs Magazine, Issue 81
CASE STUDY NO. 4 – BOSCO’S BIG BREAKTHROUGH
The importance of font size really hit home this year in our co-op. Eight-year-old Bosco was hardly making any progress in learning to read sight words. Using high interest words would perk his interest for a bit, but not for long. Instead, as time went on, he became increasingly inattentive, and he began to exhibit behavior problems.
I decided to take a different approach. I made him extra-large picture and word cards and we switched to phonics. We worked on decoding AY words that only have two sounds to decode: say, hay, ray, pay, day, bay, and jay.
And miracle of miracles, Bosco learned to read them! His excitement was palpable; it was as if a light bulb went off. For a few weeks after that, we continued learning to decode with extra large blending cards and never had I seen him so interested, focused, or proud of his progress.
Then one day, I wanted to see if he could read familiar words in a smaller font. Unfortunately he couldn’t. When I asked him if he could see the words, he simply turned away and said in a small voice, “I want to be done now.”
This confirmed my suspicion that Bosco could learn to read as long as he had the right resources.
So, if you have a student who shows very little attention and/or makes hardly any progress in reading, consider the effects of poor visual acuity.
Font style and size are really important! Our kids do best with bold, sans serif fonts that are no smaller than 18pts, although anything greater than 24pts is preferable. When children are beginning to read, the larger the font, the better.
With all those factors in mind, I created this set of mini decodable stories for my son. Again, picture pairing is an important component of these decodable stores. Students read a word and find the matching picture. Then they read a mini story that uses the words they have just practiced. These Short Vowel Stories are available for free on the blog or you can purchase it at Amazon:


Once your child has learned to sound out all the short A words in the Montessori Pink Series, start the Short A stories in Short Vowel Stories. Once he/she has learned all the short O words, start the Short O stories, and so on. It is helpful to use a pointer to point to each word as your child reads. I also recommend using a book holder so that the book is in a vertical position. This will help with your child’s posture.
Most children will need *lots* of practice reading CVC decodables before moving onto words with consonant blends and vowel teams. Be prepared to spend lots of time reading many CVC decodables and wait for fluency before moving on.
Here are more decodable readers your child may enjoy:
Montessori Pink Series CVC Bundle
Decodables Nonfiction Bundle Units 1-6 (Unit 2 has the CVC decodables)
Of course, one of the wonderful things about working at the CVC level is that there are many library books you can borrow that focus on CVC words. Be sure to check out my post on Our Favorite Books for Emergent Readers for more reading practice. Remember, font size matters! So if your child has issues with vision, be sure to choose books with large fonts.
PHONOGRAM TILES
are another power tool for teaching children with DS to read and spell.
English words are not just made up of letters; they are made up of phonograms. Phonograms are single letters or combinations of two to four letters that make up one vocal sound. For example, “sh” is two letters but together they make one sound and should be taught as one unit. There are 72 different phonograms in the English language, and phonics is essentially learning the sound of each phonogram and how phonograms blend together with other phonograms to create words.
A movable alphabet is sufficient for working at the CVC level, but for the long term, phonogram tiles help children see how 2-4 letters that constitute one phonogram make one sound.


Many phonics programs offer phonogram tiles, but children with DS, especially young students and those with visual impairments or fine motor challenges need large tiles. Large wooden phonogram tiles are hard to find and need to be custom ordered.
Here is a set of large phonograms you can print on card stock and laminate:
To use the movable alphabet or phonogram tiles for decoding:
- spell out a word with the letters/tiles
- pull each letter/tile down as you or your child sounds out the word
- read the word slowly and then at normal speed
- let your child choose the correct picture from a matrix of 2-3 pictures
If you have an older beginner with strong fine motor skills and good eyesight, you could try this smaller magnetic set . This set allows you to keep all the tiles visually organized — a great advantage when you want to build many words.
Pacing Board for building words/spelling
Learning to spell should accompany phonics. Decoding is moving from part to whole: seeing how the phonograms combine to make the whole word. Spelling (encoding) is moving from whole to part: segmenting whole word into its phonograms and prefixes or suffixes, if any.
I have found that using a pacing board greatly facilitates spelling, especially in the early stages. Many children, in the early stages of spelling, tend to omit the vowels. Using a pacing board gives them a visual reminder of how many letters/phonograms they need to complete the word.
Here is a pacing board for CVC words. Consonants go on the red dots and the vowel goes on the blue.

Here’s an example of how we use phonogram tiles and a pacing board to spell:
Demonstrating how to segment a word and allowing the student to choose the letter/phonogram is the first step in teaching a child to spell. As I wrote earlier, I had to do the segmenting for a year before my son was able to start segmenting himself. But you can encourage participation by having the student choose the letters as you segment and arrange them in the correct order so as to build the words.
In this way, phonogram tiles enable children to practice the process of spelling without having to write letters while segmenting. For some children, phonics only begins to make sense when they start building words with tiles, so this is a very important activity.
Worksheets for Tracing and Writing Words
Writing words also strengthens a child’s memory for reading. After a child has built a word with phonogram tiles, you can write the word and have him/her trace or copy it. As much as possible, pair each word with a picture. This will increase comprehension and make the activity meaningful. When working on spelling, accept any effort your child makes at handwriting, and don’t insist on neatness. Work on refining handwriting at a separate time.
Short Vowel Words for Tracing and Spelling is a large set of worksheets I made for my son to facilitate the writing of CVC words. Again, it’s free on this blog.


With this set of worksheets, students can 1) read and trace, 2) read, match to the picture, and trace, 3) fill in the missing letter, and/or 4) spell the word. Have your child do as little or as much as necessary. But remember, it’s totally fine to do the segmenting for your child and let him/her choose/name the letters (while you write them down). Eventually, your student should be able to do more and more of the segmenting on his/her own.
These worksheets correspond to the words and pictures from Short Vowel Stories, so as your child is reading Short Vowel Stories, you can supplement with these worksheets.
Orthographic Mapping and Memorizing Sight Words
All of the activities I recommended above help your student with decoding and orthographic mapping.
Decoding is the process of sounding out words. Learning to decode allows a student to figure out new words independently.
Orthographic mapping is storing a word in long-term memory for easy and instant recognition.It differs from memorizing whole sight words in that orthographic mapping is how our brains link the letters in words (graphemes) to the sounds in words (phonemes) in a way that lets us remember those words permanently.
My observation is that some children with T21 who have learned a large bank of sight words before starting phonics become masters of memorizing words by sight. So once they learn to blend, they only need to decode a word several times before they are able to move it into their long-term memory. Whether they use orthographic mapping or continue to memorize the whole shape of words, I don’t know. Certainly word building and spelling activities help with orthographic mapping. But the point is this: they learn to quickly memorize new words for instant recognition.
Instant recognition of words is necessary for fluent reading. Can you imagine having to sound out ev-er-y sin-gle word you read in a book? Reading would become tedious!
The only way for a child to learn to instantly recognize a word is through repetition. This is why repetition and review, through the activities of decoding, word building/spelling, tracing/writing, and, most importantly, reading lots of books is so important.
For many children with Down Syndrome, once-a-day reading lessons may not be enough for them to move written words into their long-term memory. You many need to write a few new words on flashcards each day or week and put them around the house (bathroom, car, bed room pillow, kitchen table) so that throughout the day your child is reviewing those words.
In any case, if your child is learning to decode all the short A CVC words (ie. cat, bag, dad), please do not move on to the next vowel until your student can instantly recognize most of the short A CVC words.
When your child is reading a new decodable, you should notice different paces of reading. He will read orthographically mapped words with ease. But when your student comes to an unfamiliar/new word, he will slow down and sound it out (probably with your help).Then your student will pick up the pace again as he reads familiar words.
If your child is slowly decoding every single word in a decodable reader, he has not orthographically mapped or sight-memorized those words. You should go back and practice those words with the Montessori cards and/or phonogram tiles or do throughout-the-day practice and then return to the reader.
Ways to help your child memorize new words after decoding:
If problems with moving words to long term memory persist, consider using a blended approach: after a child has sounded out a word several times, teach it as a sight word using the match-select-name method. Then together compose simple sentences which include the new word, so your child can practice reading it in the context of a meaningful sentence.
This way, your child does not get bored or frustrated at having to decode the same words over and over. Furthermore he/she continues to build his sight word vocabulary, his visual discrimination skills, and his memory while slowly practicing the skill of decoding that will eventually help him to read independently.
Here are some ways to help your child move newly decoded words into their long-term memory for instant recognition
- Practice reading and matching the words to pictures (Montessori cards). Frequency and spaced practice is important. Practice reading and matching the same 3-4 new words several times a day.
- Show your child a picture of the word and help him/her build it with phonogram tiles.
- Write short sentences containing the new words. Help your child read the new words in the context of different sentences. Ask your child to dictate a sentence using a new word. Write it down. Ask your child to find the new word and underline or circle it. Then, together, read it outbid.
- If possible, have your child trace the word. Writing the word helps with orthographic mapping.
- Do word sorts. For example, help your child put all the short A words into a pile and then all the short E words into a pile. Then, help him/her read them. Conversely, your child can read one word at a time and put it into the correct pile.
- Use the match-select-read process of learning sight words.
- Read lots and lots of decodable readers containing the new word/targeted phonogram.
What should a reading lesson look like?
In each reading lesson, try to cover the following activities:
- Practice decoding with the Pink Montessori Language Cards. Review old cards and learn new ones. To add variety, sometimes build words with the phonogram tiles instead of using the word cards.
- Practice reading one new decodable and one old decodable. Preferably, the new decodable should include words your child practiced decoding with the Montessori cards.
- Practice building words with the Pink Montessori language card pictures and phonogram tiles. If your child is able, encourage him/her to trace or copy some of the words.
- Practice tracing or spelling CVC words. Use worksheets from Short Vowel Words for Tracing and Spelling
- Together, read a library book or phonetic reader that uses the CVC words your child has learned. This is an important time to work on reading comprehension.

All of these activities do not need to be completed in one sitting or even in one day. Do as much as your student can handle, break the lessons into small chunks, and work on incrementally building up his/her ability to focus.
For more of my favorite resources for teaching CVC words, see this post: Teaching Children with Down Syndrome to Read: Our Top Ten+ Resources for Beginning Phonics
This chart shows how all the recommendations above address the learning challenges that many children with DS have to overcome in order to decode:

What About Reading Comprehension?
Reading comprehension in children with DS tends to lag behind their decoding ability. One reason for this is that decoding words phonetically tends to be difficult for children with DS. So, if they’re putting a lot of effort and concentration into decoding and articulating unfamiliar words, comprehension may take a back seat, especially if they have short-term memory deficits.
However, if they’re reading by sight, they don’t need to decode; they can put more thought into comprehension. This is one reason why we want our students to recognize words instantly.
Because reading comprehension is linked to listening comprehension, Shared Book Reading is an important way of building vocabulary and reading comprehension.
Shared Book Reading is so much more than just reading a book out loud to your child or taking turns reading. SBR is, essentially, a shared experience during which parent and child converse about the characters, plot, and illustrations, and how these bridge into our own lives.
The most important point about Shared Book Reading is that it should be a very enjoyable and pressure free. At first, the conversations may seem more of a monologue as you do all the commenting and answering of your own questions. That’s okay! With time, and little by little, you can gently encourage your child to respond by pointing to pictures in the book and then by using sign language or visually supported speech. Reading the same picture book repeatedly will help build your child’s confidence with regards to talking about the book.
Here are some ways to help our children build reading comprehension through shared book reading:

Stage 2B – Teaching your child to decode all the phonograms
Once your child is easily reading CVC words with comprehension, you should celebrate! This is an important milestone in your child’s education! Now he/she is ready to learn and decode the rest of the phonograms.
Words are usually grouped into these categories:
- CVC words such as cat, dog, and hen.
- Words with Consonant Teams such as SH in show, CH in chair, TH in this, WH in what
- CVCE words (words with silent e at the end) such as cake, bike, and tote
- Words with Vowel Teams such as EE in keep, OA in boat, AI in sail, and EIGH in eight and words with dipthongs such as OY in boy, OI in spoil, OW in cow, and EW in few
- Words with Consonant Blends: initial blends such as star, ending blends such as in hand, and words with both initial and ending blends such as in stamp.
- Words with R-Controlled vowels such as for, star, her, firm

Once your child can decode CVC words easily, I recommend using a phonics program that is both systematic and thorough to guide you through all the phonograms in these categories. There are many great phonics programs available, but few that are easily accessible to children with Down Syndrome due to small font size, insufficient pictures, long word lists, handwriting requirements, or lack of built-in review. As a long time homeschooling mom and curriculum junkie, I’ve seen, tried, and used many different phonics programs.
Currently, my favorite phonics program for children with Down Syndrome is:
The Science of Reading Guided Curriculum
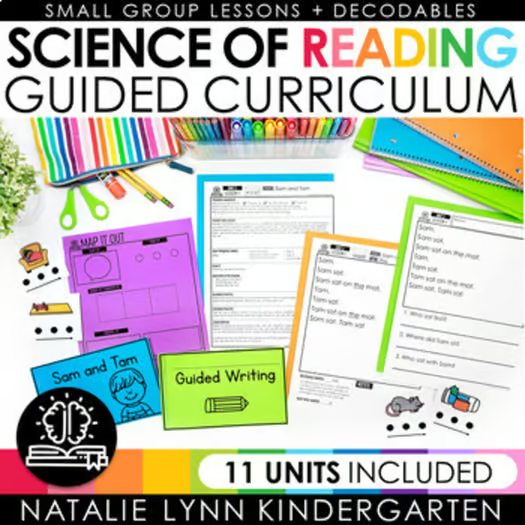
Currently in our co-op, we are using The Science of Reading Guided Curriculum by Natalie Lynn Kindergarten. It is an affordable print-and-go curriculum that teaches all the phonograms in an incremental and systematic way while providing an abundance of review. It covers decoding, word building, vocabulary, and reading comprehension. I especially appreciate the bite-size lessons. And it comes with 211 decodables!
If your child is reading CVC words fluently, start at Unit 4 (digraphs). Otherwise, start at Unit 3 for a review of CVC words.
Here are some samples from a unit in The Science of Reading Guided Curriculum:

Blending sheet: Students find and underline the new phonogram. Then they sound out the words.

Picture page:
- The teacher says the name of each picture. The student listens for the sound of the new phonogram. (Not all pictures will have the sound of the new phonogram; on this page it does)
- The teacher points to a picture and the student finds the matching word on the blending sheet. (Not all pictures are written on the blending sheet)
- Later, students can practice building/spelling these words with phonogram tiles.

Blending Practice: Students practice sounding out words they will encounter in the decodable reader. They read the words with different voices to build fluency.

Decodable Reader: Students practice reading words with the targeted phonogram in the decodable reader.

New vocabulary: students learn a new word found in the decodable reader.
Here are some videos of how we use the materials:
I highly recommend The Science of Reading Guided Curriculum because, aside from the Montessori cards and the large phonogram tiles, it provides the materials needed to follow the six steps we used in First Steps with Phonics for teaching new phonograms.

Additional Resources
The Science of Reading Guided Curriculum is a thorough and complete phonics program through grade two. But you may want/need to supplement with other materials. Here are some we really found helpful:

The Montessori Blue Series Language Cards helps children master words with consonant blends. Again, picture pairing helps build comprehension and makes decoding a meaningful activity.

The Montessori Green Series Language Cards give children practice with vowel teams and consonant teams.

I knew Silent E was going to be a tricky concept, so I made this book for my son, and it’s free on this blog. Each page has lots of pictures: The child reads a word and finds the corresponding picture. I use colored fonts as an aid.

Vowel Teams Differentiated Cut and Paste Sorts
Sorting is an excellent way to review and reinforce vowel teams. I printed these on card stock and traced all the vowels in blue and the consonants in red. Next, I laminated them, because I knew my son would need repeated practice. We used these at the easiest level: my son read the words and then placed them in the correct column.

Missing Teams Differentiated Cards
This is another great way to review vowel teams and set the stage for spelling. Since my son is was not writing lowercase letters with ease at the time we used them, I made vowel team cards to fit into the boxes. We only used the cards with the missing vowel teams. I give him three vowel teams to choose from. We reviewed the sound of each team. Then he selected which was the correct one for each word.

These are meant to be posters, but I printed and bound them into booklets. My son would read a few pages each day. These provided excellent review as well as some new, challenging words. It was also a great way to work on articulation. With a picture accompanying each word, these are another great substitute to the fluency pages in All About Reading.
Most traditional phonics programs are challenging for children with T21 because they require children to read long lists of words and they assume students can write lowercase letters.
We started phonics when my son was five, and he was not able to write lowercase letters. In addition, he really resisted reading long lists of words. The materials I listed above are much more motivating because a picture is associated with each word (thus aiding reading comprehension) and the pictures made the process of sounding out more meaningful. The use of color to highlight the targeted consonant blend, consonant team, or vowel team, helps students to identify and focus on them. Again, font size is also an important factor when our kids are first learning to sound out words, and in general, the bigger and bolder, the better.
Stage 3 – The Orthographic Stage
Once children can easily decode all or most of the phonograms, they can read most level 1 and 2 readers in the library. They can also read many picture books.
Soon, your student will need to start decoding chunks of words instead of single phonograms. This will enable him/her to decode words with 3+ syllables including words with prefixes and suffixes.

To prepare for this, I recommend teaching many multi-syllabic sight words to prepare students for the orthographic stage.
A Bridge to the Orthographic Stage


Stage 3A – The Early Orthographic Stage
Consolidating knowledge of phonograms and preparing for syllabication
In this stage, you allow your child’s knowledge of phonograms to simmer, as you would a slow-cooked stew. So I call The Early Orthographic Stage the Simmer Stage.Your student continues to read level 1 and 2 readers out loud to you. The focus is now on comprehension — retelling the events and answering who, what, where, when, and why questions. When your child comes to an unfamiliar 3-4 syllable word, you demonstrate how to break it up into decodable chunks (syllables and/or morphemes). But you don’t require your student to break up the words him/herself… not yet, not for about a year or longer.
When teaching the rules of syllabication, demonstrate how to break a word into it’s syllables and morphemes for several months to a year before asking your child to apply the rules of syllabication to multi-syllabic words him/herself.
This will set your student up for success. For now your student is learning by observing and active participation.
In order to properly break up multi-syllabic words into decodable chunks, you need to know the following:
- The six syllable types and how to identify/label them in words
- The rules for dividing words into syllables
- How to identify and label schwas . Schwas are lazy vowels in unaccented syllables that often make a short u sound instead of their proper long or short sounds. For example, in the word “China”, the last syllable is unaccented, and the A says “uh”. Schaws are actually the most common vowel sound in the English language, so it’s important to teach our students about them.
- The different types of morphemes and their meanings. A morpheme is the smallest unit of meaning within a word. Morphemes include base words, roots, prefixes, and suffixes. Knowledge of the meaning of different morphemes can help students not only decode but also figure out the meaning of unfamiliar words. For example, “trans” means across, “port” comes from the Latin word, porto, which means carry, and “ation” denotes “act or condition”. So trans-port-ation means the act of carrying across.
The good news is if your student completed The Science of Reading Guided Curriculum, you and your student will have already learned about syllable types and rules as well as schwas in two-syllable words. So demonstrating how to divide multi-syllabic words should not be too difficult.
But to help, I made these handy reference charts:
The Rules for Dividing Words into Syllables:

As you demonstrate dividing words into syllables, label each syllable type.
Here are the types of syllables and how to label them:

Here’s are video examples showing how to teach/demonstrate breaking a word up into its syllables.
Here is a PDF of the large syllable labels that we use:
I recommend printing them on cardstock and laminating for durability. I also put magnets on the back so we could use them on magnetic whiteboards.
In addition to knowing the rules of syllabication, you’ll need to teach your child about schwas and morphemes.
Facts about the schwa:

The Four Types of Morphemes:

You may also like a list of common suffixes, prefixes, and roots:
90 Common Prefixes from All About Learning
30 Common Suffixes from All About Learning
Common Latin Roots from Schoolhouse Teachers
Common Greek Roots from Schoolhouse Teachers
If all this information is overwhelming, don’t worry! Keep an online dictionary handy for reference. It will show you how to break each word up into syllables, and you can see where the schwas are (indicated by an up-side-down e).
Again, the goal of the simmer stage is to let your child grow in confidence and fluency in reading 1-2 syllable words while preparing him/her for decoding longer words.
During this Simmer Stage, have your student read picture books out loud to you every (school) day.
Using Picture Books to Teach Multi-Syllabic Words
Why picture books?
Because the quality of reading material is so important. We want our children to love reading. As soon as possible and as much as possible, we want our children reading real, high quality literature. Your time as teacher is limited; your student’s attention span is also limited. Thus, it is preferable for our children to spend the the bulk of the lesson reading real books they enjoy rather than decoding lists of words or deciphering passages on worksheets.
Picture books are visually appealing, and the pictures help students comprehend the story/text. Very often, I have been able to explain the meaning of new words with the help of the pictures. In addition, you can use picture books that are most interesting to your students. This is the method I am currently using with my 7 year old son (with DS), and when we come across a new word in our reading lesson, he actually wants to learn how to decode it. He is motivated to learn each new word in the context of the story he is reading.
This PDF gives detailed instructions on how to use picture books to teach multi-syllabic words:
Here are some videos of this using flash cards of multi-syllabic words chosen from pictures books to build vocabulary and practice decoding complex words:
Reading multi-syllabic words and matching them to a picture:
Matching a picture to a multi-syllabic word:
Matching a multi-syllabic word to its definition:
You can choose any picture books you like, provided the font size is large enough for your student to read without eye strain and there are at least four new words in the book. One of my favorite sources of picture books is the monthly list from Read Aloud Revival. Don’t forget there are picture books about science, history, geography, art… and pretty much any topic your student would like to read about.
If this method is done every day over the course of several years, your student will learn how to decode and read hundreds of multi-syllabic words and build an impressive vocabulary.
Eventually, your child will be ready to start applying the rules of syllabication him/herself. I call this:
Stage 3B: The Advanced Orthographic Stage
In this stage, continue with the Picture Book Method, but encourage your student, little by little, to apply the rules of syllabication him/herself. Little by little move from
demonstrating
to collaborating
to encouraging your student to decode independently.
With explicit teaching and lots of guided practice, many children will be able to use syllabication rules to divide multisyllabic words. However, when a word is really long and complicated, it may be easiest just to check the dictionary and divide it for the student. The goal of breaking words into syllables and/or morphemes is not for our students to become expert linguists, but for them to automatically see chunks in large words for quick decoding and spelling. Words and chunks within complex words should be practiced and reviewed until they are orthographically mapped (instantly recognized).
If you decide to use All About Spelling (which I really recommend) to teach your child to spell, all of the rules about syllables and lessons about morphemes will be further reinforced.
Additional Resources for Learning to Decode Multi-syllabic words:
If your find your child still needs a more systematic approach, you may find some of these resources helpful:

Prefixes and Suffixes Word Wall and Sorting Activity. I printed these out, put them in alphabetical order, and created a Prefix reference book and a Suffix reference book. These are great for explaining the meanings of different prefixes and suffixes as we come across them in new words during our picture book reading.

Over 60 percent of English words have Latin or Greek roots, so it’s very helpful for students to be able to identify them by sight and to know their meanings. Hence, the Greek and Latin Word Wall and Sorting Activity . I also I printed these out, put them in alphabetical order, and created a Root Words reference book.
*************************
Two More Phonics Programs to Consider
Finally, because I believe in giving parents options to choose what is best for their child, here are two more phonics programs that can work with adaptations and/or supplementation:
All About Reading

All About Reading has become the gold standard in phonics programs for homeschoolers. The materials are bright and colorful, and the stories are engaging. The activity books are full of fun games and activities, and the teacher’s manual gives detailed instructions that are easy to follow.
If your child is fluent in reading CVC words, you can start with Level 2.
There are two drawbacks: First, font size may be an issue for some children with DS. Second, one of the most important aspects of this program are the fluency pages, which consist of long lists of words that students have to decode.
These long lists may pose two problems:
- They can be overwhelming. When I first tried All About Reading, my son with DS absolutely refused to try. One look at the list of new words overwhelmed him, and he shut down. I think many children with DS would balk at such long word lists. Decoding long lists of new words is mentally taxing for our children.
- There is the possibility, particularly for children with DS, that decoding long lists becomes a phonetic exercise void of comprehension. This is not a habit we want our children to develop. This is why picture pairing with Montessori language cards is so important; as much as possible every word our kids decode in the early stages should be paired with a picture to help with comprehension.
If you want to give All About Reading a try, I recommend foregoing the fluency pages and supplementing with the Montessori language cards instead. For example, if your child is learning to decode words with initial consonant blends, practice decoding words using the cards in the Montessori blue series set that have initial consonant blends. You could also use All About Reading as a spine, and supplement it with as many fun picture-based activities as your creativity allows. Otherwise, to use it as is, I would only recommend it for an older beginner (9 years old+) who has strong eyesight and good focus.
One major advantage of All About Reading is the teacher’s manual. The teacher’s manual gives decoding tips for several of the words on each fluency page, and points out many of the morphemes and their meanings. Parents with little knowledge of syllabication and morphemes can confidently use All About Reading because the teacher’s manuals are so thorough and clear. Knowing and understanding the different morphemes is vital for advanced reading and comprehension. Children who complete the whole series of All About Reading should be able to fluently decode three and four syllable words and read at a late fourth grade level.
You can see sample pages of the student activity workbook here.
Raising Robust Readers

Raising Robust Readers is a program designed particularly for children and adults with Down Syndrome. It is based on the book, Phonics the Right Way. It’s a great read for any parent interested in teaching their child with DS to read because it gives many excellent teaching tips.
Unfortunately, the authors discourage the use of teaching sight words and are strong proponents of phonics first and foremost. However, they do offer many great suggestions.
What sets this program apart is the use of songs and videos to teach phonograms. This online course is full of a variety of resources, from instructions for the parent/teacher, to games, worksheets, and decodable readers.
Two potential drawbacks for this program are:
- A significant amount of parent/teacher preparation is needed. Teachers need to find and compile the resources for each phonogram from various places on the website and print them out. One important aspect of this program is helping the student find and point out phonograms in the environment, such as on street signs and cereal boxes. While this is a great idea, it does take some extra planning and foresight. Some parents have found that the prep work is too much.
- While the Train the Brain Readers provide very focused practice with targeted phonograms, they do not provide enough built-in review for mastery. You will need to supplement with other decodables. However, because their sequence of teaching phonograms is so unique, it may be difficult to find decodable readers with phonetically-controlled vocabulary that align with their sequence.
Which one should you use?
It depends on your child and your own strengths and limitations as the teacher.
The Science of Reading Guided Curriculum is best for print and go bite-size lessons, large font size, incremental steps, built-in review of phonograms, and affordability. It’s also great for busy teachers and for students who like routine, as the format of each lesson is the same. The bite-sized lessons are helpful for children with really short attention spans. Upon completion, students should be reading at a late second grade level. I do wish the pictures were in color.
All About Reading is best for quality printed materials, ease of use for the parent teacher, thoroughness, and built-in continual review of spelling and syllable division rules. In addition, All About Reading goes beyond teaching students to decode one-and-two syllable words; it teaches students to decode more complex words. Students who complete All About Reading successfully should be reading at a late fourth grade level. Again, for children with DS, this program is best suited to older students with strong vision and good focus.
One good option is to start with The Science of Reading Guided Curriculum, and once your student has completed that, move to All About Reading for more advanced and thorough decoding skills.
Raising Robust Readers is best for songs and videos that teach the different letter sounds, phonograms, and syllable rules. This is a great program for creative teachers and for students who need a variety of games to practice phonics. Raising Robust Readers is also the most playful, hands-on program I’ve seen. However, I still maintain that the best way to gain fluency in reading is by reading lots of decodables and emergent readers. So be sure to supplement with plenty of readers.
So there you have all the stages of learning to read,
my best advice,
and my favorite resources.
Little by little, day by day, with patience, consistency, and lots of encouragement, you can teach your child to read.
For a PDF e-book version of this post here:
Teaching Children with Down Syndrome to Read: A Parent’s Step-by-Step Guide
Found this post helpful? Share it with your friends!
This post is AMAZING. Thank you so much. We have recently finished See & Learn Phrases and will be moving on to See & Learn Sentences this fall. My son can read right around 100 sight words now, so we are ready to start into some phonics and I was struggling to figure out how. Thank you SO much for all this info and help.
I do have a question…do I teach him to sound out words that he already can read by sight? For example, he knows the word “cat” by sight. Do I teach him how to sound out “cat” or do I just leave it as a sight word? Does it confuse things to teach them how to sound out something they already know as a sight word? Thanks!
Hi Kat! Great question! I would leave it as a sight word. The whole point to blending is learning how to decode a word independently and then move it to long term memory for instant recognition. Blending is a means to an end. If your child can already instantly recognize a word, no need for blending! You want to help your child understand that purpose of blending is for figuring out new words. Some children do get confused when asked to blend words they already know by sight. They begin to think that the process of blending is what is important. So emphasize what is important is moving newly learned words to long term memory and use picture pairing so blending is always meaningful.